1931 Ford Model A Roadster

1931 Ford Model A Roadster

Thursday, February 27, 2014

Roadster News

While waiting on the block to come back from the machine shop with the new valve seats, I got the counterweights welded on the crankshaft.  The first two pics are checking the crank for straightness after welding.  Center journal is slightly out but will be straightened at the crankshaft shop before balancing.


Indicating crank.


The ball on the radius rod or wishbone was badly worn out of round by 3/8 of an inch.  This is the main cause of shimmy in the Model A.  They sell a kit with rubber bushings or a cup shaped washer to make up the wear but these both change the geometry of the front end and don't really fix the problem.  The only thing to do is to build it up with a welder and grind it back round to 1-1/2 diameter as original.  Here I am using a washer with the correct size hole as a go - no go gauge.  As you can see it is almost done but still a little large.  I will hand file to the exact fit.  I had to do the same thing with the ball on the end of the shifter and will have to do it on all the balls on the steering linkage as well. 
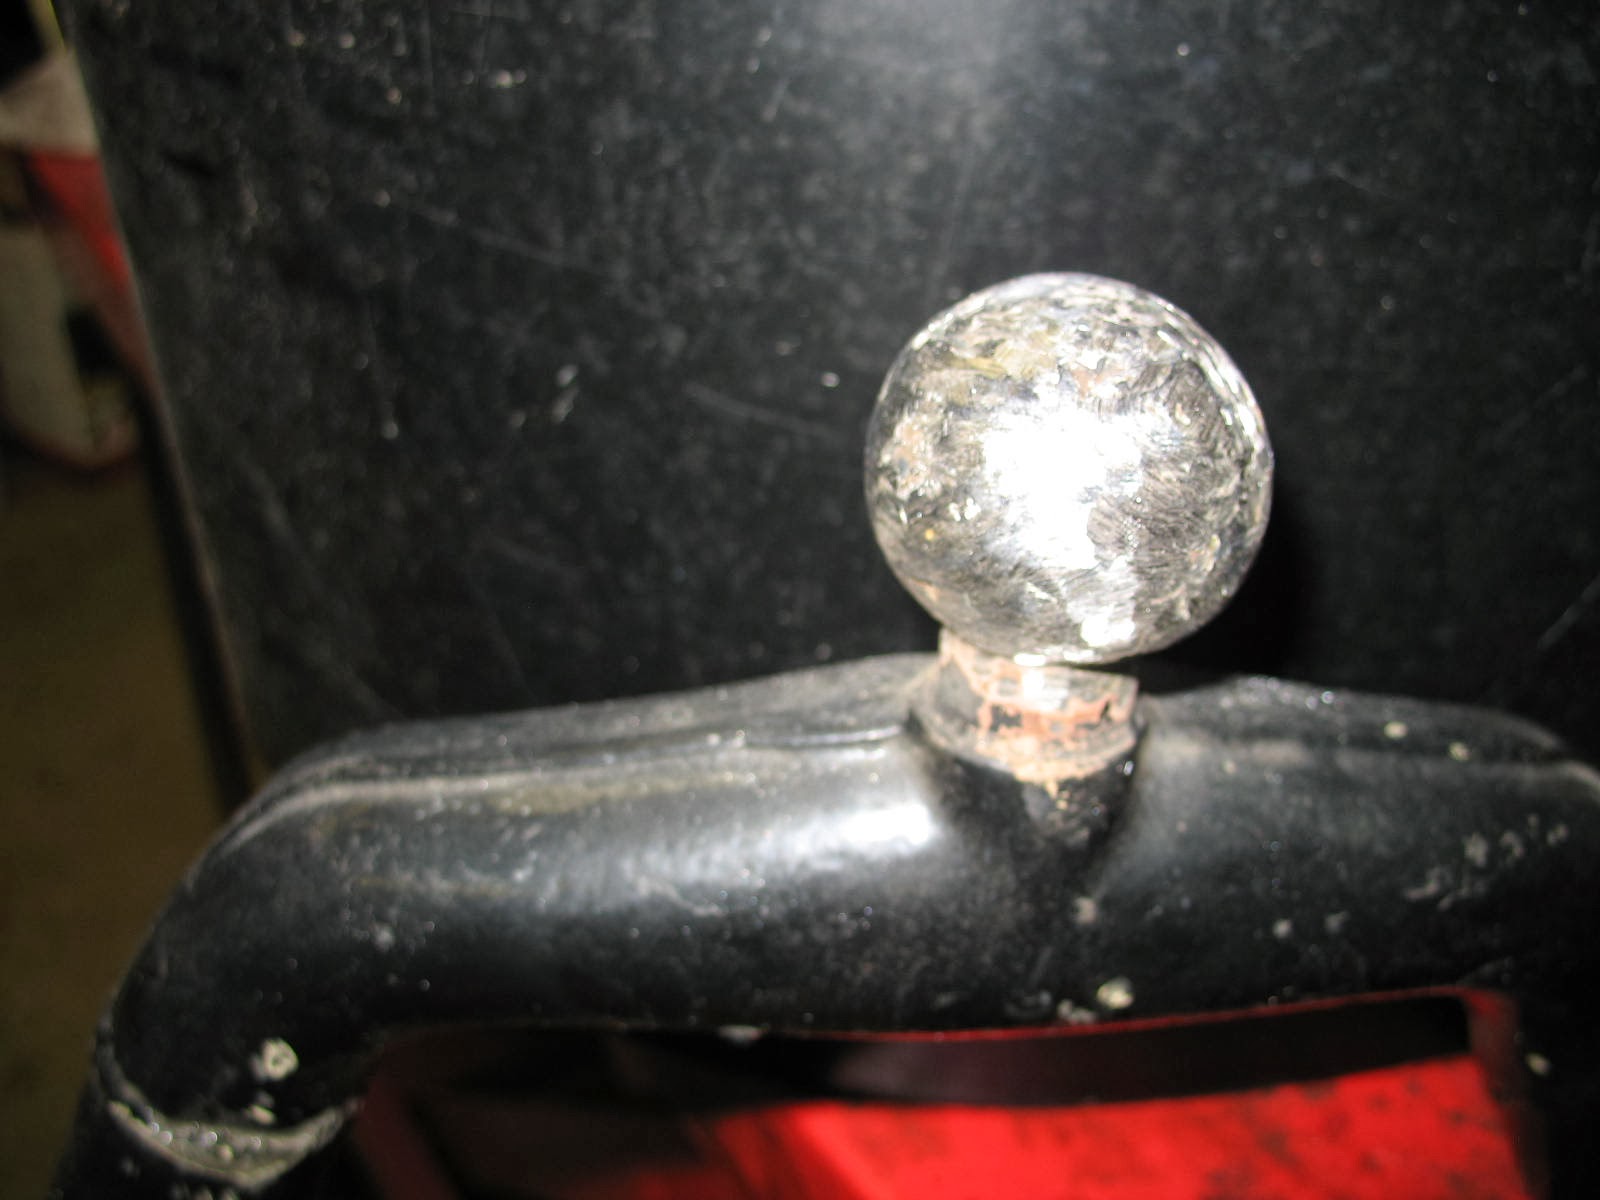

Radius ball.


 Next is a pic of the original instrument cluster.  In 1928 and 1929 these were smooth, but in 1930 and 1931 they added the ridges and made the speedometer round instead of oval.  

Original dash panel.

If you were a smoker these ridges were the perfect place to strike your matches although it burned the chrome off your dash.  They make a repro replacement but they don't fit very well, so for my birthday Walt and Linda gave me an original in much better shape.  

Better dash panel.

Here it is with the ignition switch and ammeter installed.  The gas gauge is in the tank which is the dashboard so the gauge just sticks through the top hole in the cluster.  

Better dash panel with inst.

They also gave me a set of Ford wrenches for my tool kit and a valve spring compressor for the A.  Flywheel pics next week.

Ford tools.


Tuesday, February 18, 2014

A lucky "A" day

Today Walt and I took the engine block to his machine shop in Morganton to have the new valve seats installed - should get it back next week to start the re assembly.  Tomorrow I'm going to pick up our lightened flywheels that Tommy Berry put on his big lathe.

Flywheel housing.

  Having finished the transmission I discovered the bell housing had a series of cracks running through it in 4 places and had to be trashed.  We sorted through Walt's scrap pile and found a good one to use.  

Finished transmission.

Walt has a friend in Marion that just finished a 31 Roadster identical to this one including paint color.  Of course I didn't bring my camera cause I thought we were just going to the machine shop.  So we go over to Frank's and see his car and this is the first roadster I've seen that is identical so I start asking questions about this and that and making notes of what I'm missing that I didn't even know I was missing.  Every thing that I asked about he said, "I have an extra set of those, want em?"  So we go home with all kind of parts and he would not take a penny for them.  Said "I'm done with my roadster and aren't going to need them, you can have anything you want and come back anytime you need anything."

So, I came home with body patch panels (wipers are sitting on them) for the doors and cowl, wood for the subframe to frame connections, wood sets for all the interior upholstery to tack to.  

Frame to body wood.

Interior wood set.

An original Ditzler A model paint guide including all the color chips for mixing paint. (I had really been wanting one of these but you can't get them anywhere!)  

Original paint color chips.

An original vacuum wiper motor, stainless vacuum conduit that goes up the windshield frame and new arms and wipers.  A set of rumble seat brackets and bumpers and a stack of literature and books......for free! Talk about a good day!  More as it happens.

 Wiper assembly and rumble stops.


Saturday, February 15, 2014

Transmission Rebuilt

Second day in a row of snow and ice so I decided to stay in and rebuild the transmission. Took it apart and cleaned up all the gears. Then went back together with all new bearings and seals and safety wire.  These were notorious for leaking the oil out around the gear shafts but today you can buy new shafts with O-ring seals machined in them so that's what I did. Everything is new except the gears which were ok. This transmission is totally non synchronized so if you don't double clutch or time the shift correctly you get gears crunching together.  The case was so full of metal shavings from the old bearings that after washing it out I had to take a magnet and cover every inch of the inside to get the tiny shavings out. Then I rinsed it again and painted it the correct Ford green. The ball on the gear shift was worn flat on all 4 sides so I welded it back round and tomorrow I'll turn it round again and put the top back on the transmission. Also had to weld  the ball on the wishbone and grind it back to round.  Pics of that when I get them smooth.


Sunday, February 9, 2014

Busy Weekend

Yesterday I got the polycarbonate sheets in the garage window openings. North side just has 1ft window but south side has 4ft window for lots of light so I can see to work.  Next I'll close in the gable end with steel studs and more polycarbonate sheets.  I'll either make garage doors or find some scratch and dent ones from my garage door suppliers. The p-1800 moved in one side and the roadster went in the other. 


I almost have a rolling chassis as soon as my bearings for the steering sector arrive. I started assembling the body pieces to see what I was missing and almost finished before the cold got to me.  Looks like I have a lot of body repair but not much missing. Mostly the sub rail assembly and floor pans are all I need now. As you can see I mounted two of the old tires on the newly painted rims so I could roll it in the  garage. Boy that was a job. Needed Mike to help walk those stiff tires on but I did it with a plastic trash bag for lubrication and it worked ok. I'll wait for help before I do the other four. Ready for the week of snow  ahead.


Thursday, February 6, 2014

High Compression Head Just Arrived

Getting ready to go!!! New head just arrived. Third generation of getting it done! High comp CNC machined head will get us up to speed in the Roadster.


New Garage

They got the garage up today. Now I have to go to Lowes tomorrow and buy the polycarbonate panels to  make the  "windows"  and when a  garage door comes along I'll close in the front, but for now I have a place to work when it's raining!


Tuesday, February 4, 2014

Getting the Crank Ready for Balancing

Decided to fit the crankshaft counterweights that I had waterjet cut last week to the crankshaft.  First I had to find the  lowest spot on the original crank weight with a dial indicator. Marked it and then found the center line of the new weights.  Moved over to the milling machine and set up each weight over top of an unmachined one for relief and started milling. Each of the four original crank weights was a different diameter so I had to machine each one to fit, so I numbered them so no mix up could occur prior to welding them on.  I made a lot of metal shavings today and had a great time doing it. Who knows what might happen tomorrow!


Set up.


Dial indicating.

After milling.

On the crank.


Monday, February 3, 2014

Part 2 Pics

Daughter Laura reminded me that I need to include pics of Walt in this, so here are two that Mike took this weekend as we were removing the shifter spring with Walt's homemade tool that  works very well.  


Walt.


Second picture is transmission  disassembly and third is Walt's tool.  

Special tool.

Fourth picture is the cam gear. I wanted to get a new cam as the original one is not useable so I had to get the gear off so I could send the old cam in for a new one. Even Walts special tool would not remove the nut from the end of the cam.  Apparently after sitting for so long the fiber gear absorbed moisture and swelled up and rusted itself to the cam. Walt suggested breaking the gear off and sawing around the broken hub with a hacksaw to free up the nut. So we did, Still stuck!  We spent the next hour with a tiny chisel and with Mike holding and me hammering the fiber gear remains we got it off.     

Old cam gear.

It has been so cold and  snowy I haven't been able to paint but Sunday was warm and I got all 6 wheels sanded and painted.

Painted wheels.

  I wanted to get the tires on them so I could have a rolling chassis and start assembling suspension parts soon. So I decided to wash the tires before installing them.  I started washing with tire cleaner and the more I scrubbed the yellower they got.  Seems the last time the wheels got painted yellow the tires got painted yellow also and then  the yellow was covered up with tire blacking. As soon as the tire blacking came off the yellow showed up. I tried paint thinner, lacquer thinner, xylene, and nothing would cut the yellow paint. Next I got a can of paint remover and some steel wool and after a lot of scrubbing, the yellow finally came off.  Then I washed off the paint remover and  put them in the shop next to a dehumidifier to dry out the insides which had gotten really wet.  That's all for now.


Tires.


"A" Progress Report

This weekend Mike came up and we loaded all the parts that required specialty tooling to disassemble in the truck and headed to my friend and technical advisor Walt's place. 
We took apart the steering column and sector that was difficult to come apart even with the special tools.  Inside we discovered there was no oil whatsoever.  These were notorious for leaking around the arm and out the hole in the bottom where the horn and headlight wires exit.  As you can imagine the bearings were trash but the gears were useable.  I ordered new seals and  will machine the steering box to accept more modern needle bearings and a modern seal and we will have no more leaks.  The steering tube needed new threads cut to hold the wheel on so we did that, but the spark and gas levers were rusted stuck so they will need some soaking to loosen them.  
Next we disassembled the transmission, same story no oil, bearings fell apart, shafts were marginal but the gears are totally useable.  So I ordered all new bearings and gaskets and shafts that have a groove for an o-ring seal so the oil will stay in place.  The shifter had worn the ball off the end of it so I will build it back to standard size and re-grind the ball end.  Hope to have the parts by the end of the week and will document the re-assembly.


Steering Column


Steering Sector


Transmission


Transmission Shifter