1931 Ford Model A Roadster

1931 Ford Model A Roadster

Sunday, March 30, 2014

Rear End and Springs Part 2

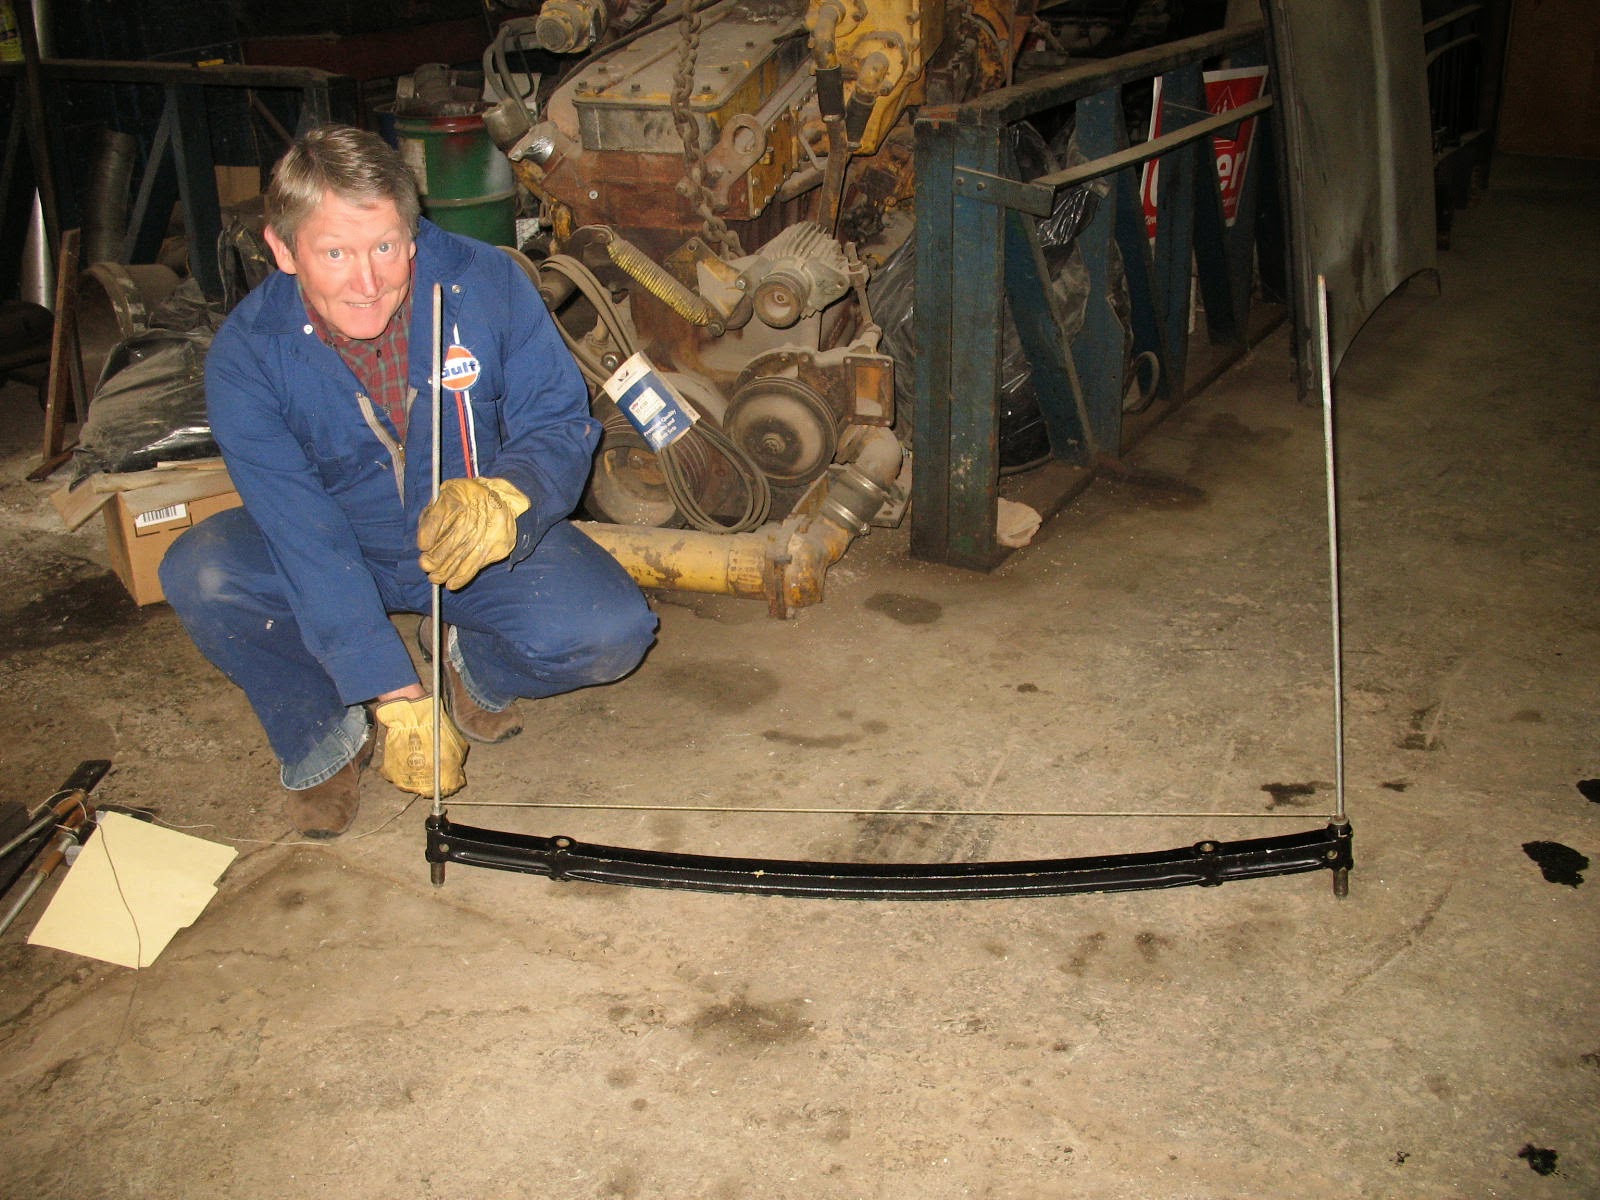
Today I decided to disassemble the rear spring.  I put six large C clamps on it and started unscrewing the center bolt which broke just like the front one did.  Lots of pressure on this one, much more than the front.  Kept moving the clamps down one leaf at a time until I got them all off except the main leaf.  It still had so much strength I had to chain it to the axle to remove the shackle bolts.  When I got it apart I realized it had too many leaves and that is why someone had put the u bolt bars on upside down.  It had a 10 leaf spring in it for sedans and pickup trucks.  Roadsters only used a 7 leaf spring.  Tomorrow I will go to Walt's and measure his leaves and remove the three that don't belong.  Then I will grind and sand and re paint and grease it before re assembly just like the front one.  New shackles and bushings will also be needed.  Walt is in the process of locating for me all the missing hand brake bands, levers, linkage etc.  He  is certainly a great friend and a valuable resource for this restoration. 


Rear spring.


Next I took the differential apart to see what it needed.  Took off the torque tube first which I noticed was missing the speedometer drive gear and housing and all the bearings, bushings and seals for the front of it.  Differential gears look ok, one rough tooth on the ring gear and the pinion has slight pitting.  Pinion has 9 teeth and the ring gear has 34 which makes it a 3:78 gear ratio differential.  Tomorrow I will take it to Walt's and press out the bearing and seals and see what else it needs to make it like new again.  Hopefully just bearing and seals and some new gaskets and shims and we can get a good pattern on the gears again.  SS

Differential.


Saturday, March 29, 2014

Rear End and Springs

Since the front end is finished it was time to work on the rear end and rear spring so today I removed  the assembly from the car.  After removing the rear wheels I put a wheel puller on the rear hubs and removed them.  The keyways that hold the hub on should have been about 4 inches long but were only 3/4 inch.  Also the rear grease seals were leaking and had soaked the rear brake shoes so they will have to be replaced.  Also found out someone had removed the entire emergency brake system from the car so I will have to find all that and replace them.  The left rear spring shackle is broken as you can see from the picture and the radius rods bolts on that side were also loose.  I will have to remove the bearing in the hubs to see if they are good or not.  The good news is that the rear end was full of oil, however it was the wrong kind .  Should have been 600 wt but instead was mp80/90.  Tomorrow I will remove the spring, torque tube, and driveshaft and the two axle housings to see what the gears and bearings look like. SS


Saturday, March 22, 2014

Rolling At Last!

Today I installed the backing plates with the new shoes and actuator pins.  Then I pressed in new inner and outer races for new wheel bearings in the brake drums and hubs.  I let the tires sit out in the sun all morning and installed them on the rims.  It was much easier to install them warm than cold.  I also used different bags for lubrication this time.  I used grocery bags this time instead of heavy duty garbage bags because they were thinner and it was much easier to install the tires this time.  Mounted the wheels and tires on the car and finally have all 4 wheels rolling at once!  Steve

Backing plates.

Drums.

Front wheels.

Wheels and tires.

Back side.

Side view.


Friday, March 21, 2014

Front End Almost Finished

Yesterday Mike and I went to Walt's to work on the front spindles.  I had previously bought all new bearings,  bushings, shims and seals for the front end but didn't have the drivers to press the old ones out and the new ones in.  I also needed the reamers to fit the new king pin bushings in the spindles.  Walt agreed to let us use his tools and watched us to be sure we did it right.  So we first pressed out the old bushings in the spindles and removed the old grease fittings, then pressed in the new upper and lower bushing in each side.  That was the easy part.  Next we used a fixed reamer to align the two bushings and start the reaming.  This left the bushings too tight to fit the king pins so we switched to an adjustable reamer and slowly removed a tiny amount at a time until the pins would tightly fit one end or the other but not both bushings at once.  Then we switched to a hone and did the final fit with that.  We got an exceptional fit on the kingpins but it took several hours.  

Front suspension.

Left spindle.

Right spindle.

Today I installed the spindles to the axle with new spindle bolt bearings, shims, and seals, along with the brake actuator arm and levers.  Then I installed the wedge pins and nuts that hold the king pin in the axle.  Next I torqued all the nuts to specs and put cotter pins and everything to keep it in place.  Then I installed new grease fittings and gave it a grease job.  Unfortunately someone had painted all these parts previously so the rebuild really ruined the paint.  I will re-paint later after all the mechanical work is done .  Last week I had welded up all the balls on the spindles that connects the steering arms and ground them round again.  You can see one coated in red grease in one of the pictures.  

Round steering ball.

All that is left on the front end is to install the backing plates for the brakes and install the drums and wheels.  Then I'll remove the rear spring and differential and rebuild them.  SS

Front end.

Sunday, March 16, 2014

Steering Sector Rebuild

Today I decided to start the rebuild on the steering sector.  After I cleaned all the old grease out I pressed out the old bushings.  Then I used a fixture Walt made to bore the end where the steering arm protrudes from the casting.  This casting sits in the frame at an angle so the two faces are not parallel.  Therefore a fixture is needed so that the new opening is true to the bore and not the outer casting.  These never had a seal from the factory so they always leaked around the steering arm and caused premature wear on all the parts.  So today I will press the bushings in deeper to allow for a modern seal to be pressed into the housing.  After the opening for the seal is made I pressed in new bushings and used Walt's reamer to size them to the steering shaft.  Then I pressed in the modern oil seal and we are ready to start on rebuilding the rest of the steering box where the worm gear is housed.  SS

Boring steering sector.

New bushings.

New modern seal.


Friday, March 14, 2014

Front Suspension

Now that the front axle has been straightened, I found a new leaf to replace the broken one in the front spring and started assembling the front end today.  I painted all the spring leaves so they wouldn't rust like before and found some waterproof lithium grease with Teflon in it.  I coated the leaves and assembled them with all new bolts.  Then, new bushings and spring hangers in the end of spring and spring perches.  I did a loose assembly to check everything before bolting the spring to the frame and found that the spring perch bolts did not fit the axle tightly.  Now that everything else is tight and new we can't have the spring perch moving around.  The hole was .012  bigger than the bolt so off I go to Grainger to buy some shim stock.  All the auto parts used to keep shim stock but no one uses it anymore so Grainger is the only place that keeps it.  After shimming the perches, everything is nice and tight again.  Next I will press in the new kingpin bushings and ream them to fit the new kingpins.  Then I will clean up the front end and repaint.  The axle lost a lot of paint in the press Wednesday and the springs will need new paint after the grease is done oozing out between the leaves.  I just had to jump up and down on the frame to see what the new suspension felt like.  I do believe it's much tighter than I remember from the last time I was in the car!  Too bad Mike wasn't here to photograph that!  Later. SS


Axle and springs.

Spring perch bolt.

Wednesday, March 12, 2014

Front Axle Repair

As soon as I finished adding the new leaf to the front spring, I was ready to assemble the front suspension to the frame.  I got the front axle and cleaned the holes for the spring perches and king pins and was just about to start assembly when I noticed the front axle looked like it had an unusual curve to it.  So I did some checking and  discovered that the four holes that should be in line with each other were out by 3/4 of an inch.  Both ends of the axle were bent back at the spring perch holes and the center had been pulled forward as well.  I also discovered that it had a 1/2 inch twist in it and the left side kingpin boss that should have had a 7 degree angle was almost straight.  I called all the local alignment shops to ask about straightening an axle and quickly discovered they don't do that anymore and if it was going to get straightened I was going to have to do it.  So I did some research and discovered that some simple jigs and rods were all you needed if you have a large press.  So I made the jigs and headed to David's transport shop to use his press.  I cut the tops off the old king pins in my lathe and used them as a base for the indicator rods as they would fit the holes perfectly.  Mike came over to help and in under an hour we had it as straight as it came from the factory.  The axle is a special steel that Ford called the AA alloy and it is very flexible.  You had to press the axle past the centerline to get it straight as it springs back a lot when you let off the press.  This was a fun learning experience and I'm sure the car will handle like it should now.  Thanks again to David and Mike.  More pics when it goes back together!  SS


Front axle set up.

Front axle straightness check.

Front axle 7 degree angle.

Front axle and alignment rods.

Front axle centerline.


Front axle in press.


I just found these old Ford pics from 1931 showing the strength of the A model axle!


Ford axle twists.


Friday, March 7, 2014

Flywheel and Clutch

Here are pictures of the original flywheel that has been lightened on the inside and outside faces and rim equal to the amount if weight that was added to the counterweights on the crankshaft. 


Lightened flywheel.


This  equalizes the rotating mass so that it is distributed along the crankshaft length instead of just at the back end at the flywheel.  This keeps the flexing of the crankshaft to a minimum and eliminates beating the babbitt bearings out of the center main.  The outer ring that centered the A model pressure plate has been milled off and the flywheel drilled and tapped for the late model Ford v-8 and 9-n tractor pressure plate.  Mike and I found some of these at Wilson's tractor parts in Shelby.  

Late model pressure plate.

The one in the picture is brand new and I have two spares.  This clutch holds better and uses half the pedal pressure of the original A pressure plate.  Now that this is finished we will take the crankshaft, flywheel and pressure plate to be balanced.  I hope they will allow me to photograph the balancing process!  If not you can look it up on You Tube and see it done.

Wednesday, March 5, 2014

Springs and Steering

I decided to take the front spring off this weekend to press out the old shackle bolts and bushings and press in new ones.  When I got it off I saw that the third leaf was broken.  So I put two large C-clamps on the spring and started to remove the center bolt to take the leaves apart.  As soon as I put pressure on the wrench the bolt snapped in two.  The springs were also rusted together and the bolt was almost rusted in two.  


It's a good thing I decided to take them apart because if I had left it as is, the first good bump in the road and the spring would have come apart.  Now I will get a new third leaf from Walt and polish the rest.  


In the third picture you can see how the leaves wear into the one below them to the point they can't flex anymore as they are locked together.  When you hit a bump and it can't flex, they break. 


 So I have to grind the surface flat so they can slide over each other.  Also, bevel the bottom of each leaf so it can't cut in to the one below it.  Then I polished them smooth.  When I get a new third leaf and center bolt I will grease them and reassemble to go back on the crossmember. 


I also decided to take the steering linkage off the spindles to press in new bushings and see how the balls look on the spindles.  


As you can see they are worn flat on both sides and will have to be built up with weld and ground back round again like the radius ball rod.  The upper bushings looked pretty good but the lower ones were thin as paper, so I'm sure steering and stopping this car was a challenge. More pics when parts are rebuilt.